Android Library
Install Sweet Pricing with our client library. Follow our 4 step guide to use dynamic pricing and track purchase events in your existing Android app.
1. Download the Client Library
Download the client side library from our Downloads page:
If you are using Gradle, place
the JAR into the <project-dir>/libs directory,
and add the following to build.gradle
compile files('<project-dir>/libs/dynamicpricing-1.2.0.jar')
Your app will need the
android.permission.INTERNET permission.
2. Initialization
Before you can start recording data or obtaining pricing information, you must initialize the DynamicPricing client.
You should create an instance of
DynamicPricing.Builder and then use
DynamicPricing.setSingletonInstance to set the
singleton instance.
This allows you to use the DynamicPricing class
throughout your application to track analytics.
public class SampleApp extends Application {

  private static final String ANALYTICS_WRITE_KEY = "YOUR APP KEY";

  @Override public void onCreate() {
    super.onCreate();

    // Initialize a new instance of the DynamicPricing client.
    DynamicPricing.Builder builder = new DynamicPricing.Builder(this,
            ANALYTICS_WRITE_KEY) //
        .trackApplicationLifecycleEvents() //
        .recordScreenViews();

    // Set the initialized instance as a globally accessible instance.
    DynamicPricing.setSingletonInstance(builder.build());
  }
}
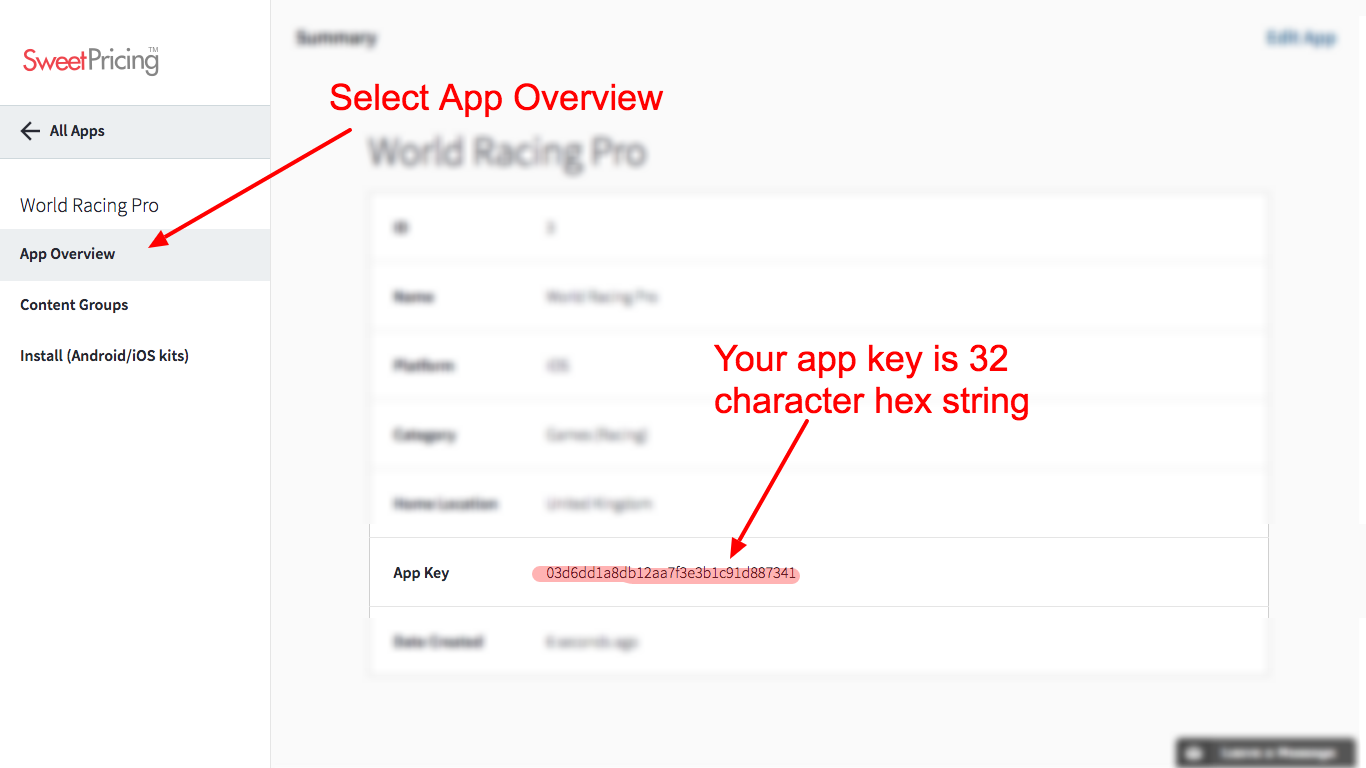
Where Can I Find My App Key?
The app key is a public identifier for your app. Sign into App Manager, select your app and view the 'App Overview' screen. You can see your app key listed on this page.
3. Fetch the Product ID
Ordinarily, you will send a Product ID to Google's getSkuDetails() API. Before you do this, you will need to query the current Product ID from Sweet Pricing. The product ID is no longer a fixed constant, but can change whenever in-app pricing is updated from App Manager. If your app is using segmentation, the product ID will correspond to the segment the user is in.
Because this involves a network request, you will need to create a
new FetchVariantTask which extends
AsyncTask.
To the constructor, you must pass the singleton instance of
DynamicPricing. You should override
onPostExecute to get the response, which is an
instance of Variant.
The Variant class exposes a function
getProductSku which, given an integer Sweet Pricing
product ID, will return the string Product ID to be passed to
Google's API.
Firstly, create the task:
private static final int PRODUCT_GROUP_ID = 4;
private static final int PRODUCT_ID = 8;
private static final String PRODUCT_DEFAULT_SKU = "android.test.purchased";

/* [snip] */

// When you need to obtain a pricepoint SKU for a particular product, you must create a
// new FetchVariantTask...
FetchVariantTask task;
task = new FetchVariantTask(DynamicPricing.with(MainActivity.this)) {
  @Override
  protected void onPostExecute(Variant variant) {
    // if there was an error, e will be an Exception
    if (e != null) {
      Log.e("MainActivity", "Error getting variant", e);
    }

    // even if there is an error, a variant object is returned
    // if there was a problem obtaining the data, you should specify a default SKU
    // to fall back on...
    String sku = variant.getProductSku(PRODUCT_ID, PRODUCT_DEFAULT_SKU);
    ((TextView) findViewById(R.id.current_sku)).setText(sku);
  }
};
If there was a problem retrieving the product ID information, you can choose to continue gracefully and use a hard-coded default product ID. (Or, if you prefer, present an error message to the user or log the error.)
Notice that PRODUCT_ID is the integer identifier that
Sweet Pricing creates.
Now, to trigger the task:
// ... Execute this task with the product **GROUP** you are displaying. This will fetch
// all the pricepoint SKUs within this group for the current user's segment.
task.execute(PRODUCT_GROUP_ID);
Please note that you only have to fetch the variant information per in-app store. For example, if you have an in-app store called 'Coins', you can fetch all coin price information in a single request.
4. Track Events
For Sweet Pricing to work, you need to record a number of events within your application. These events are periodically uploaded to Sweet Pricing, and are reflected on the 'Analytics' tab.
4a. Track View of In-App Store
Whenever you display the prices from an in-app store, you should
record that event using trackViewStore. You can pass
an instance of Variant to this function. The price
information that you provide here should come from Google's API.
List<Properties> productsList = new ArrayList<>();
productsList.add(new Properties()
  .putValue("price", 9.99)
  .putValue("currencyCode", "GBP")
  .putValue("productId", google1MonthId));
productsList.add(new Properties()
  .putValue("price", 29.99)
  .putValue("currencyCode", "GBP")
  .putValue("productId", google1YearId));

DynamicPricing.with(MainActivity.this).trackViewStore(
  variant,
  productsList
);
When you call this depends on the flow of your application. If you have one screen which shows all prices, then you can track this event when the user views the screen. For more complex schemes, you might wish to load the variant when the application starts and track a view variant event at this time.
If you are at all uncertain about when you should record this event, please contact support who will be able to look at your app and advise your further.
4b. Track Purchases
If the user makes an in-app purchase, you will need to call
trackPurchase to record this event. You must pass the
product ID that was purchased.
Important: Although you can omit
paymentData and signature, you will not
be able to use purchase validation within Sweet Pricing.
DynamicPricing.with(MainActivity.this).trackPurchase(productId, paymentData, signature);Only track this event when the purchase is complete (rather than, for example, the user clicking 'Buy').
It is generally assumed that the variant the user saw prior to
purchasing the product was the one most recently recorded using
trackViewVariant
Set Up Payment Validation
To set up server-side in-app purchase validation, ensure you are
sending paymentData and signature above.
These correspond to the
RESPONSE_INAPP_PURCHASE_DATA and
RESPONSE_INAPP_SIGNATURE parts of the in-app purchase
response.
Next, go to 'App Overview' within App Manager and copy your Google Play public key. You can find this under 'Development tools' > 'Services & APIs' within Google Developer Console.
4c. Track Arbitrary Events
You can use the track function to record other events
that might be of interest to your analytics or dynamic pricing.
DynamicPricing.with(MainActivity.this).track("Logged In");