With the introduction of segmented pricing and enriched metrics in Sweet Pricing 1.2, it became possible to tailor prices to users based a measure of mobile user engagement. With Sweet Pricing, you are able to define pricing rules to offer discounts to your app’s unengaged users, for example. This pricing strategy can help you boost app revenue.
In this blog post, I will explain how the engagement metric, which is Sweet Pricing’s measure of mobile user engagement, works. And I’ll show you how to start using it in Sweet Pricing. To use our segmented pricing tools, you will need a subscription to Sweet Pricing Pro.
We Use Enriched Attributes to Better Describe Your Users
When you install our client libraries with your Android or iOS app, we automatically collect raw data about the user and their device. And you are able to pass your own attributes to Sweet Pricing to use in our analytics tool or to segment your users.
But raw data can be… well, raw. Having access to the raw data is incredibly useful for analytics, but it can sometimes be difficult to use the data in a meaningful way. You want data that is easy to interpret, has a strong relationship with purchasing behavior and adapts to future changes.
That your user has a ‘Nexus 6P’ device is nice to know, but it is not necessarily useful for pricing. You won’t have enough data about that specific group of users to make any reliable predictions. And so these kind of attributes are not effective when you are looking to deploy segmented pricing.
But consider instead if you placed users into the buckets ‘low-end device’, ‘mid-range device’ and ‘high-end device’. Those buckets, or perhaps a metric of device value, could well show a relationship against purchase propensity. These kind of enriched attributes are far more useful when you are creating pricing models.
We Calculate Enriched Attributes for You
Our servers calculate enriched attributes in realtime. When your app asks Sweet Pricing for price information, the first thing we do is enrich the raw data. Only then do we apply your segmentation rules. This preprocessing step makes it super easy to deploy segmented pricing, removing the need for app publishers to do their own complex calculations.
Sweet Pricing’s engagement metric, which I talk about in more detail in this post, is one way to measure mobile user engagement. But we will be making more enriched attributes available over the next few months. We will publish to this blog as and when these new attributes become available.
Sweet Pricing Keeps Track of User Sessions
When you send analytical data back to Sweet Pricing, we bundle the data into sessions that cover periods of user activity. A session starts when a user first interacts with your app. And it ends after 30 minutes of inactivity.
For example, if a user uses your app at 10.00 AM, 10.20 AM and 10.40 AM, we collect these events into one session. But, if the user uses your app at 10.00 AM and 10.40 AM only, we would collect these events into two separate sessions.
The sessions concept is fairly common practice in analytics, mobile or otherwise. It allows us to understand how a user interacts with an app over an extended period of time. Sweet Pricing measures the performance of price models against sessions, rather than ‘screen views’, since that better reflects the real-world purchasing behavior of users.
Sessions are fundamental to the way we measure mobile user engagement, too. More sessions means higher levels of engagement. And, if the number of sessions is very low, that would indicate an unengaged user.
How the Mobile User Engagement Metric Is Calculated
Quite simply, we look at the number of sessions over the past 7 days for each user. And we call that metric ‘raw engagement’. It will be ’14’ if the user visits your app twice a day, every day of the week. That metric becomes a measure of how engaged the user is.
But this is an absolute metric, and you cannot use it directly in Sweet Pricing. Based on this raw metric, we create the engagement metric, which is a number that scales between 0 and 100, where 100 represents your most engaged user and 0 represents your least engaged user.
The engagement metric is evenly distributed over 0 to 100. If we measure by raw engagement, your users might cluster around two groups. You might have a bunch of users with ‘raw engagement = 0‘ and another bunch with ‘raw engagement > 14‘, for example. But the final engagement metric scales evenly, which makes it easier to use and interpret.
If you create a segment with the rule ‘engagement > 80‘, you are targeting the top 20% of sessions of your most engaged users. That allows you to target your engaged or unengaged users with precision.
You Can Create a New Engagement Segment From the ‘Segments’ Tab
The Segments tab is where you can define new user segments. You need to define your segments here before you can use them in new segmented pricing models.
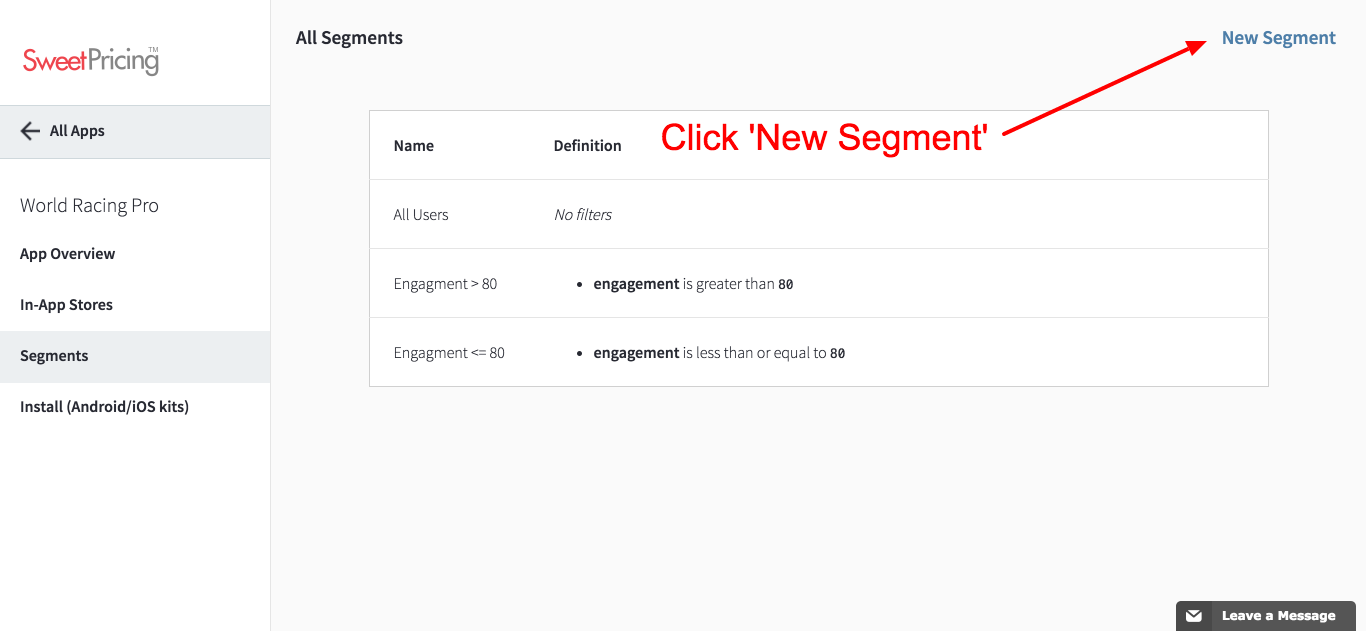
Simply select your app from App Manager, and click ‘Segments’. This page shows a list of segments you have configured. Click ‘New Segment’ to create your engagement-based segment.

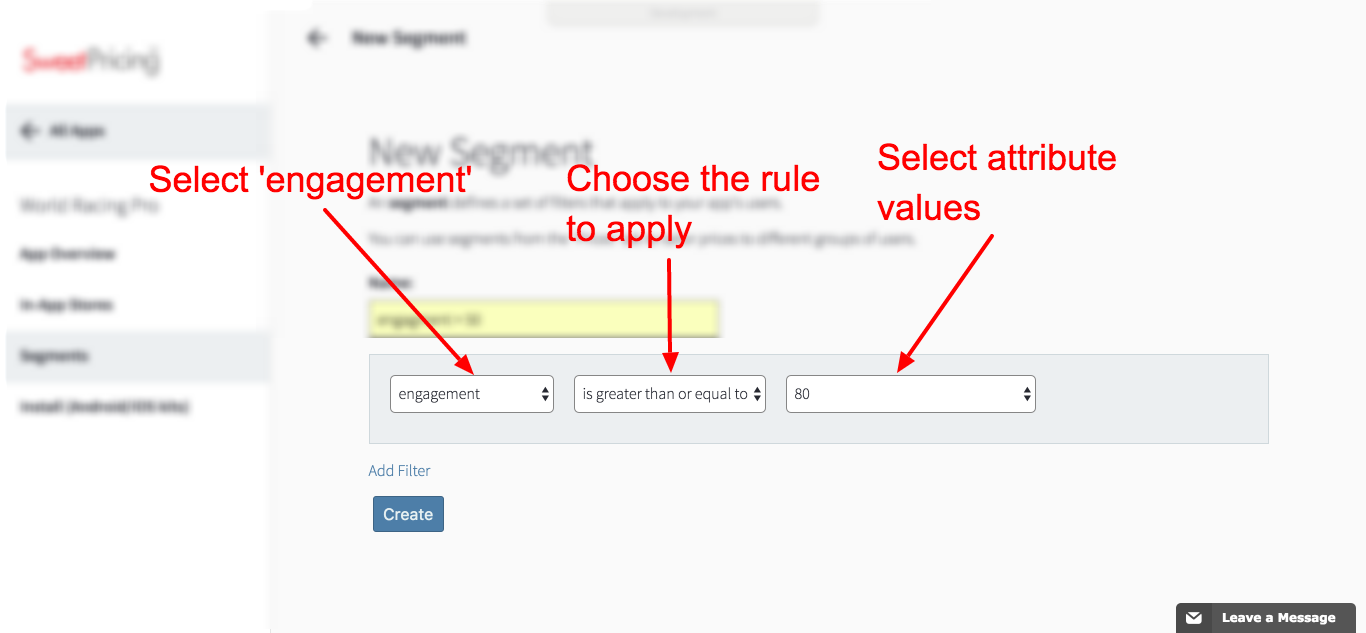
From the ‘New Segment’ page, you can create a series of filter rules. These filters, which are also available on the Analytics tab, combine to define the segment. In this case, you want to select ‘engagement’ as the attribute, ‘is greater than or equal to’ for the type of rule and ’80’ for the parameter. This will create a group of users that have an engagement metric greater than or equal to 80.

You can create an unlimited number of segments in Sweet Pricing. All the segments you create are available to use in your segmented pricing models, which you can easily create from the Prices tab.
You Can Use Segments From the Prices Tab
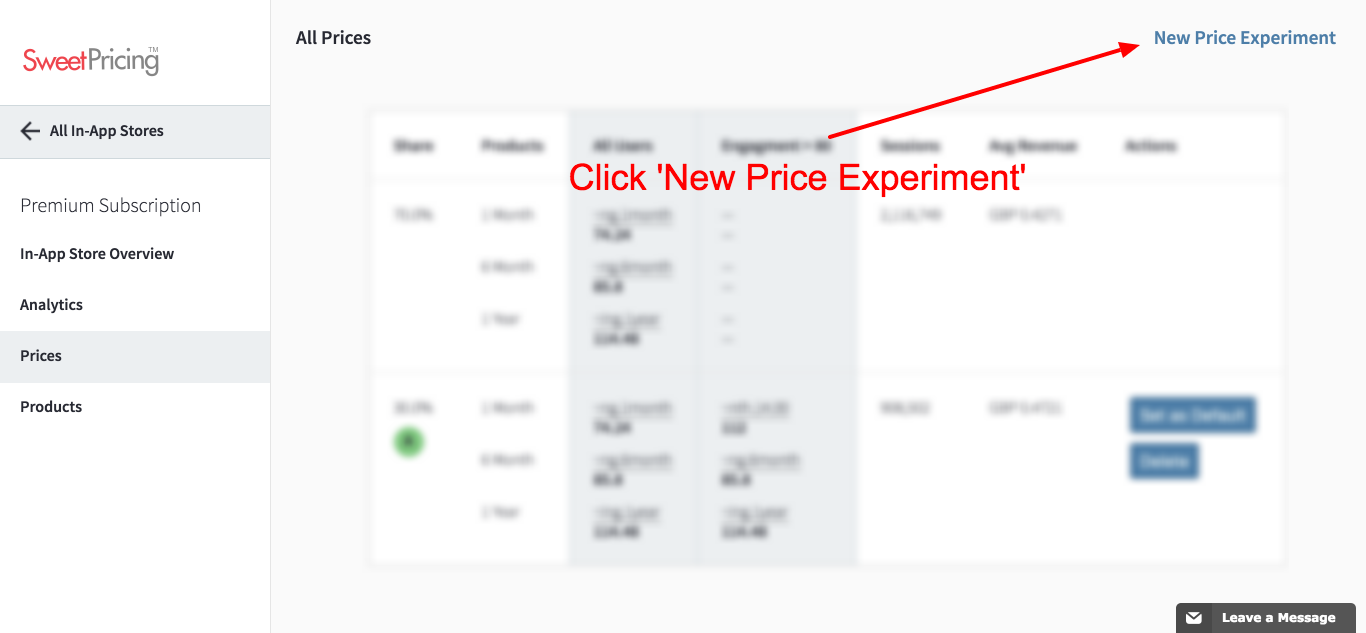
After you create a new user segment, you want to be able to use that segment in your segmented pricing models. Head over to the Prices tab and click ‘New Price Experiment’. This will display a new row in the prices table, allowing you to define a new pricing model that a test group of users will receive.

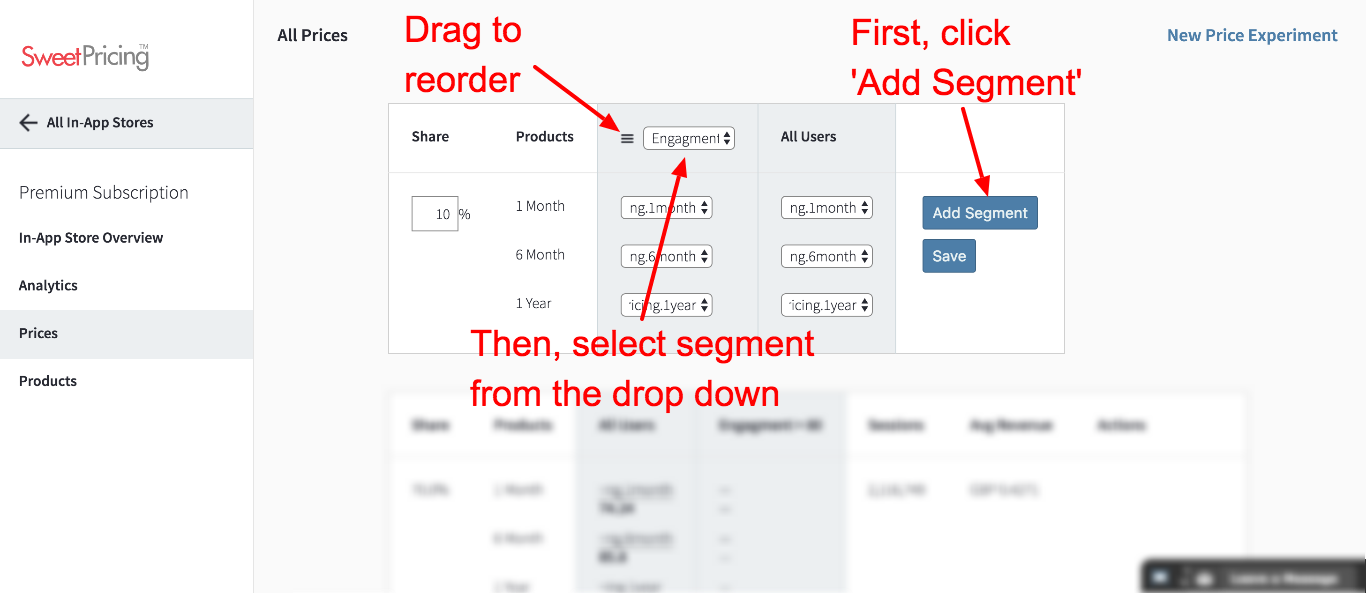
Click ‘Add Segment’ and select the segment you just created from the drop down. If you use more than one segment, you can drag and drop the columns to reorder them.

Once you click ‘Save’, your segmented pricing model becomes live for a proportion of your audience. We put users into test groups at random. The users in this test group remain in the test group for the lifetime of the experiment. So there’s no risk of one user’s session using your default model, and that user’s next session using the test group segmented pricing model.
Your experiment will run until you promote the model to your entire user base, or delete the test group. We update the ‘number of sessions’ and ‘average revenue per session’ statistics in realtime, and you can use these metrics to compare the performance of two pricing models.
If you want to promote a segmented pricing model to your entire user base, simply click ‘Set as default’ and Sweet Pricing will update your in-app stores automatically. With this feature, you can update prices without redeploying your app.
Your Thoughts
Have you experimented with segmented pricing in your app?
How did you decide on your app’s pricing model?
Do you consider measures of mobile user engagement, and other user metrics, when deciding on in-app prices?
—
Graphic: Designed by Freepik

